Using Google Slides for Non-Profit Organizations: Strategies and Tips
Introduction
For non-profit organizations, every presentation is an opportunity to inspire action, secure funding, or educate communities. Google Slides, a free and versatile tool, empowers non-profits to create compelling presentations that amplify their mission. Whether you’re pitching to donors, training volunteers, or sharing impact reports, Google Slides offers features to engage audiences and streamline collaboration. This guide explores strategies and tips for non-profits, covering fundraising presentations, volunteer training, storytelling, team collaboration, accessibility, and best practices. Let’s dive into how non-profits can harness Google Slides to make a lasting impact!
Why Non-Profits Should Use Google Slides?
Why choose Google Slides for your non-profit? It’s cost-free, accessible via Google for Nonprofits, and packed with features tailored to resource-constrained organizations. From crafting emotional fundraising pitches to designing clear volunteer training materials, Google Slides supports diverse needs. Its cloud-based platform enables real-time collaboration, allowing remote teams to refine slides together. Plus, features like templates, animations, and accessibility tools help non-profits create professional presentations without a big budget. For example, a small charity can use Google Slides to present impact data to donors, rivaling the polish of larger organizations.
Moreover, Google Slides integrates with Google Workspace tools like Sheets and Forms, streamlining data visualization and audience engagement. This versatility makes it ideal for non-profits aiming to communicate effectively while maximizing limited resources. Ready to elevate your presentations? Let’s explore the strategies that will help your non-profit shine.
👉How to Enhance Your Google Slides Presentations with Advanced Techniques
Crafting Compelling Fundraising Presentations
Fundraising presentations are the heart of non-profit outreach, persuading donors to support your cause. Here’s how to create impactful slides:
Tell a Story:
Start with a compelling narrative about your mission. Use Insert > Image to add emotional photos (e.g., beneficiaries smiling).
Structure slides with a clear arc: problem, solution, impact. For example, describe a community challenge, your program, and success stories.
Visualize Data:
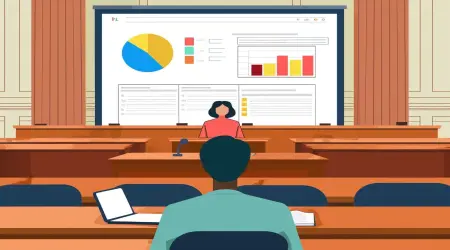
Link Google Sheets charts via Insert > Chart > From Sheets to show fundraising goals or impact metrics.
Use animations (Insert > Animation, e.g., Fade in) to reveal data points sequentially, keeping donors engaged.
Include a Call-to-Action:
End with a bold slide using Insert > Text box to state, “Donate today at [website].”
Add a QR code (Insert > Image) linking to your donation page for easy access.
Example: A non-profit focused on clean water creates a fundraising deck. They open with a photo of a child drinking contaminated water, followed by a chart showing wells built with past donations. A final slide with a QR code directs donors to contribute, raising $10,000 in one event.
These techniques make your fundraising slides persuasive and professional, driving donor engagement.
👉How to See Your Word Count on Google Slides
Designing Volunteer Training Slides
Effective volunteer training slides educate and inspire your team. Here’s how to design them:
Use Templates:
Go to File > New > From template or View > Theme Builder to create a branded template with your logo and colors.
Include consistent layouts for agendas, instructions, and resources.
Embed Multimedia:
Add training videos via Insert > Video (e.g., a YouTube tutorial on your programs).
Use Insert > Audio for voiceovers explaining complex tasks.
Interactive Elements:
Embed Google Forms (Insert > Link) for quizzes or feedback, ensuring volunteers understand material.
Add hyperlinks (Insert > Link) to resources like manuals in Google Drive.
Example: A food bank trains volunteers with a slide deck featuring a video on food sorting, a Google Form quiz on safety protocols, and a linked handbook. The clear, interactive design ensures volunteers are confident and prepared.
Training slides like these empower volunteers, enhancing their effectiveness and commitment.
👉Mastering Google Workspace: How to Integrate Google Slides with Other Google Apps
Storytelling with Google Slides for Impact
Storytelling amplifies your non-profit’s mission, connecting emotionally with audiences. Here’s how to weave narratives in Google Slides:
Structure Your Story:
Use Slide > Apply layout to create a narrative flow: introduction, challenge, solution, impact.
Add text boxes (Insert > Text box) for concise, powerful quotes from beneficiaries.
Enhance with Visuals:
Insert high-quality images (Insert > Image) to evoke empathy, like photos of community projects.
Apply subtle animations (Insert > Animation, e.g., Fade in) to reveal images or quotes for emphasis.
Showcase Impact:
Create impact report slides with linked Google Sheets charts showing metrics (e.g., people served).
Use Insert > Shape to create infographics highlighting milestones.
Example: An animal rescue non-profit shares a story of a rescued dog. Slides show the dog’s journey from neglect to adoption, with a quote from the adopter and a chart of animals saved. The emotional narrative inspires donors to fund more rescues.
Storytelling slides engage audiences, making your mission unforgettable.
👉Top 10 Best Ways to Get Free Google Slides Themes
Collaboration Strategies for Non-Profit Teams
Collaboration is vital for non-profits with distributed teams. Google Slides offers robust tools to streamline teamwork:
Real-Time Editing:
Share slides via Share (top-right), setting permissions as Editor, Commenter, or Viewer.
Multiple team members can edit simultaneously, with cursors showing who’s working where.
Comments and Suggestions:
Add comments (Insert > Comment or Ctrl + Alt + M) to suggest edits, like “Add more impact data here.”
Use Suggesting mode (View > Mode > Suggesting) for proposed changes, which owners can accept or reject.
Version History:
Go to File > Version history > See version history to review past edits and restore versions.
Name versions (Name current version) like “Board Review Draft” for clarity.
Example: A non-profit’s remote team collaborates on an annual report. The program manager adds comments, the designer suggests layout changes in Suggesting mode, and the director reviews version history to ensure all feedback is incorporated, creating a polished final deck.
These tools foster efficient, inclusive teamwork, even across time zones.
Ensuring Accessibility in Non-Profit Presentations
Accessible presentations ensure all audiences, including those with disabilities, can engage with your content. Here’s how to make slides inclusive:
Add Alt Text:
Right-click images or shapes, select Alt text, and describe content (e.g., “Graph of 2024 donations”).
Use descriptive text for screen readers to convey meaning.
High-Contrast Themes:
Go to Slide > Change theme and select a high-contrast theme (e.g., dark background, white text).
Ensure text is at least 18pt for readability.
Screen Reader Support:
Use Tools > Accessibility to check compatibility with screen readers.
Use layout placeholders (Slide > Apply layout) for logical navigation.
Captions for Multimedia:
Insert videos with captions (Insert > Video, select YouTube videos with auto-captions).
Add manual captions via Format > Captions if needed.
Example: A non-profit hosting a community event creates slides with alt text for photos (e.g., “Volunteers packing food boxes”), a high-contrast theme, and captioned videos. This ensures attendees with visual or hearing impairments can fully participate.
Accessibility makes your presentations inclusive, aligning with non-profits’ values.
👉How to Effectively Use Comments and Feedback Features in Google Slides
Best Practices for Non-Profit Presentations in Google Slides
To maximize impact, follow these best practices:
Align with Your Mission: Ensure every slide reflects your non-profit’s goals, using consistent branding (logos, colors).
Keep It Simple: Use clear text, minimal animations, and uncluttered layouts to focus on your message.
Engage Emotionally: Incorporate stories, images, and data to connect with audiences on a personal level.
Test Before Presenting: Rehearse in Slideshow mode or Google Meet to ensure animations, links, and multimedia work.
Collaborate Early: Involve team members via comments and suggesting mode to refine content before finalizing.
Save Templates: Create reusable templates in View > Theme Builder for consistent, efficient slide creation.
Prioritize Accessibility: Always include alt text, high-contrast visuals, and clear navigation for inclusivity.
Example: A non-profit designs a donor pitch with a branded template, a story of a beneficiary, and an accessible chart with alt text. They test the deck in Google Meet, ensuring a flawless presentation that secures significant funding.
These practices ensure your slides are impactful, professional, and aligned with your mission.
Conclusion
Google Slides is a powerful ally for non-profit organizations, offering tools to create compelling, accessible, and collaborative presentations. By crafting fundraising pitches, designing volunteer training, weaving stories, fostering teamwork, ensuring inclusivity, and following best practices, non-profits can amplify their impact. Whether you’re rallying support or educating communities, these strategies will help you shine. Start using Google Slides today, and watch your non-profit’s presentations inspire action and change.
Pro Tip: Explore Google for Nonprofits to access Google Slides and other tools for free, maximizing your resources.